You pasted the Google Tag Manager code into your site, but Tag Assistant says it can't find the container. Or GTM works on some pages and not others. Or GA4 now counts every page view twice. All of these come from the same place: how and where the container was installed.
Google Tag Manager (GTM) is a container that loads your other tags, such as GA4, Google Ads and Meta. You install it once and then manage tags from the GTM interface instead of editing the site each time. Getting that first install right matters, because every tag you add later depends on it.
One thing changed recently. Older guides (and older containers) talk about two snippets: a script for the <head> and a <noscript> iframe for right after <body>. The current GTM install screen shows only one snippet, placed right after the opening <head> tag. Sites that already have the old two-part code don't need to be retagged, but new installs only need the one block.
This guide walks through creating the container, placing the code on a custom site, WordPress, Shopify and Squarespace, adding your first tag, and verifying everything with Tag Assistant before and after you publish.
Quick answer
- Create a Web container at tagmanager.google.com.
- Open Admin > Install Google Tag Manager (or click your
GTM-ID in the workspace). Use Select your platform for a CMS, or the Install manually tab to copy the snippet. - Paste that single snippet immediately after the opening
<head>tag on every page. There's no body snippet in the current instructions. - Remove any other copies of GTM or hard-coded GA4 tags that would duplicate data.
- Add a Google Analytics (Google tag) with your GA4 ID, triggered on initialization for all pages.
- Click Preview, connect Tag Assistant to your site, and confirm the container and tag show up.
- Click Submit > Publish, then check the live site again with Tag Assistant.
Before you start
You need:
- A Google account with permission to create a GTM account, or Publish access to an existing container.
- Access to edit your site's code, theme or code injection area.
- Your GA4 measurement ID (it starts with
G-) if you plan to add GA4 now. - Chrome, plus the Tag Assistant extension if you want the smoothest preview connection.
Check two things first.
Is there already a container? Open your site, right-click and choose View page source. Search for googletagmanager.com/gtm.js. If you find a GTM ID, find out who owns it before you add a new one. Two containers often mean double tracking.
Is GA4 hard-coded? Search the source for gtag/js?id=G-. If GA4 is already installed directly and you plan to move it into GTM, you'll remove the old code in Step 3.
Back up your theme or copy the current header code into a text file before you edit anything.
Step 1: Create the account and container
Go to tagmanager.google.com and click Create Account. The Add a New Account form has two parts.
- Account Setup: the Account Name (your company name) and Country. There's also an optional checkbox to share data anonymously with Google.
- Container Setup: the Container name (usually your domain, like
www.example.com) and the Target platform.
For a normal website, choose Web. The other platforms (iOS, Android, AMP if listed, and Server) are for apps and server-side tagging, which is a different setup.
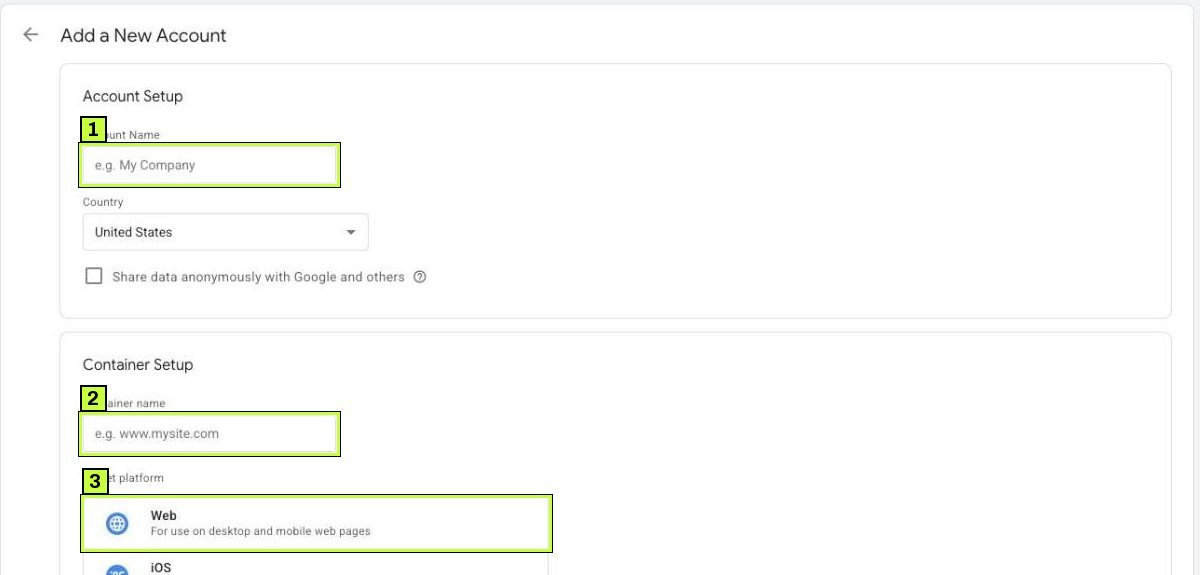
Click Create and accept the terms. GTM opens the new container's workspace.
If the account already exists, open it and create a new container from the Admin tab instead.
Step 2: Open the installation instructions
The install code lives in two places:
- In the Workspace tab, click your container ID (it looks like
GTM-XXXXXXX) next to Workspace Changes at the top right. - In the Admin tab, under the container column, click Install Google Tag Manager.
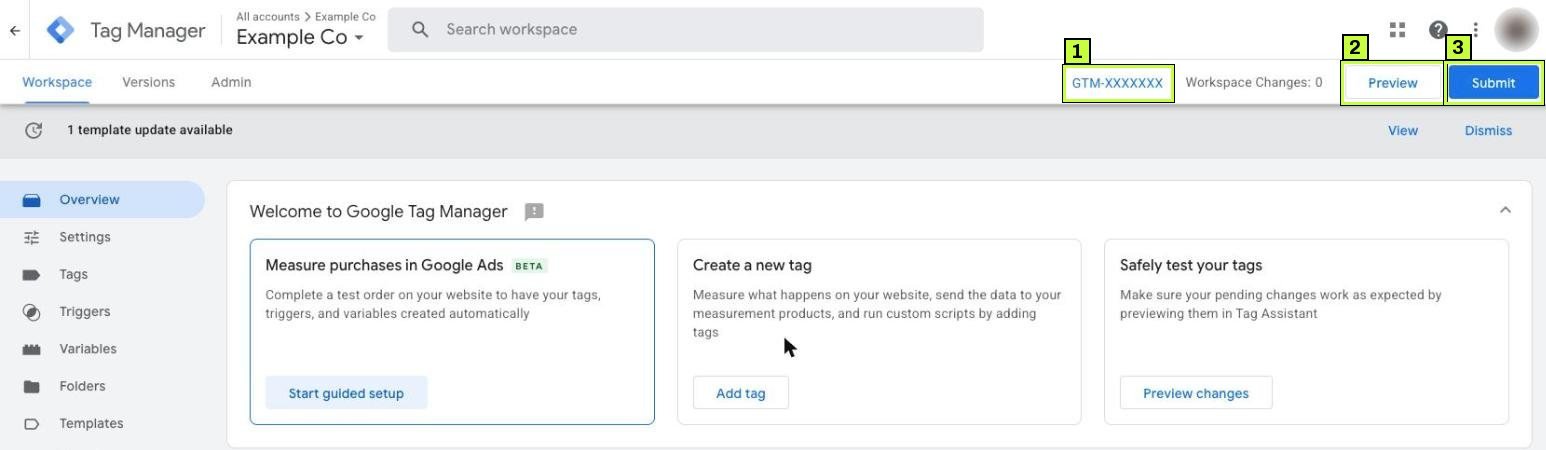
Either way, a panel called Installation instructions opens with two tabs.
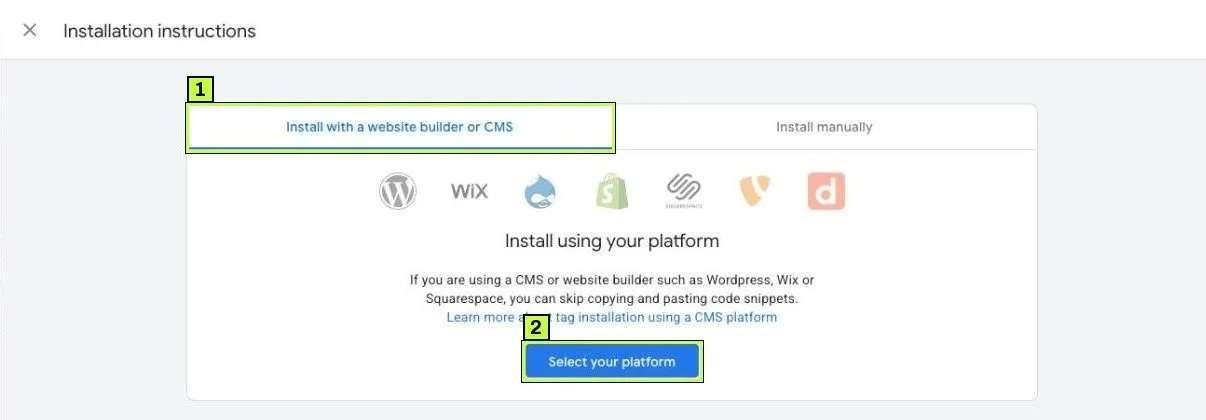
Install with a website builder or CMS. This tab shows icons for WordPress, Wix, Drupal, Shopify, Squarespace, TYPO3 and Duda, and a Select your platform button. Google's point here is that many platforms have their own integration, so you can skip copying code. Use it if your platform is listed and you'd rather follow its native setup.
Install manually. This tab shows the code itself, under the text "Copy and paste it in the code of every page of your website, immediately after the <head> element. Don't add more than one Google tag to each page."
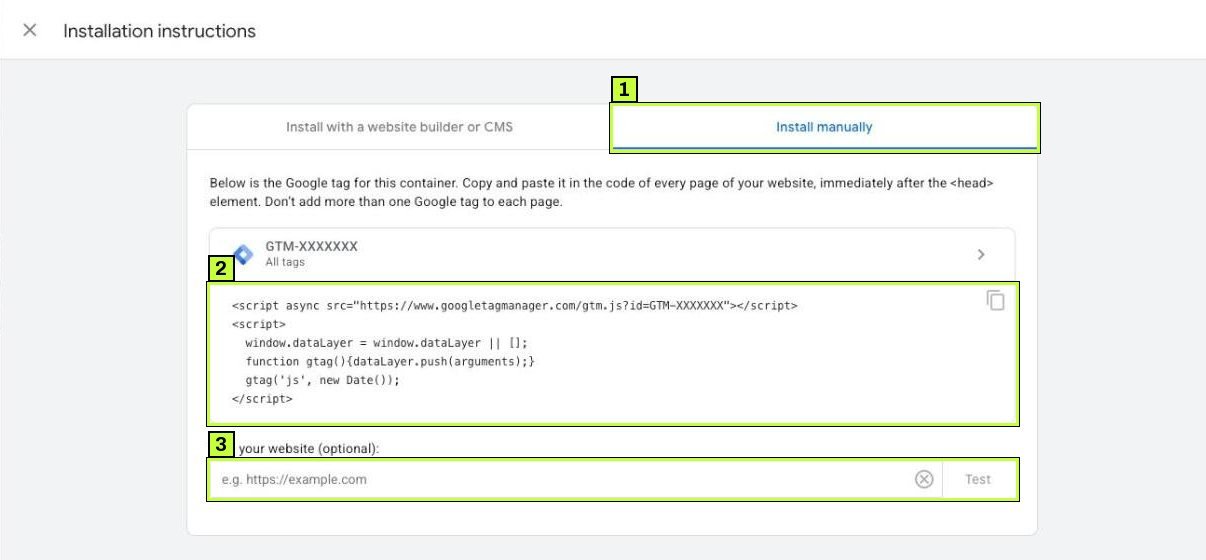
The snippet looks like this, with your own container ID:
<script async src="https://www.googletagmanager.com/gtm.js?id=GTM-XXXXXXX"></script>
<script>
  window.dataLayer = window.dataLayer || [];
  function gtag(){dataLayer.push(arguments);}
  gtag('js', new Date());
</script>
Copy it with the copy icon instead of retyping it. The ID inside must be your container's ID. There's no <noscript> iframe in this version, so there's nothing to place after <body>.
If you see the older two-part code in an existing site (a (function(w,d,s,l,i){...}) script plus a <noscript> iframe), it still works. Google's install help says you don't need to replace it. Just don't add the new snippet next to it, or GTM loads twice.
Step 3: Install the snippet on your platform
The rule is the same everywhere: every page gets the snippet once, as early in the <head> as you can. Here's how that looks on common platforms.
Custom or hand-coded sites
Edit the shared header template, not individual pages:
<head>
  <script async src="https://www.googletagmanager.com/gtm.js?id=GTM-XXXXXXX"></script>
  <script>
    window.dataLayer = window.dataLayer || [];
    function gtag(){dataLayer.push(arguments);}
    gtag('js', new Date());
  </script>
  <meta charset="utf-8">
  <title>Example</title>
  ...
</head>
If you use a consent management platform (CMP) that must set Consent Mode defaults first, follow its instructions for order. Usually the CMP's script or the gtag('consent', 'default', ...) command goes just before the GTM snippet. If your CMP runs as a GTM template on the Consent Initialization - All Pages trigger instead, the order is handled inside GTM.
WordPress
You have three common options. Pick one, not several.
- A header and footer code plugin (for example WPCode or similar). Paste the snippet in the header box.
- Site Kit by Google. It can connect Tag Manager and place the container for you.
- A child theme. Add the snippet with the
wp_headhook infunctions.php, using a low priority number so it prints early. Don't edit the parent theme'sheader.php, because updates overwrite it.
add_action('wp_head', function () { ?>
  <!-- GTM snippet from Install manually here -->
<?php }, 1);
After you install, clear any caching plugin and your CDN cache. Cached pages may still serve the old HTML without GTM.
Shopify
Shopify has two areas that behave differently.
- Storefront pages (home, collections, products, cart): add the snippet to your theme's
theme.liquidfile. Open Online Store > Themes, click the three dots > Edit code, and paste it right after<head>. Duplicate the theme first. - Checkout and thank-you pages: theme code doesn't run there. Shopify uses Customer events (custom pixels) under Settings for checkout tracking. A GTM container loaded inside a custom pixel runs in a sandbox, so Preview mode and many built-in triggers don't work the usual way.
For Google Ads and GA4 on Shopify, many practitioners use the Google & YouTube app for purchase tracking and keep GTM for other tags. Decide this before you install so you don't count purchases twice.
Squarespace
Use Code Injection. On Squarespace 7.1, open the Pages panel, scroll to Custom Code and click Code Injection. The old path (Settings > Advanced > Code Injection) now redirects there. Code injection isn't available on every plan.
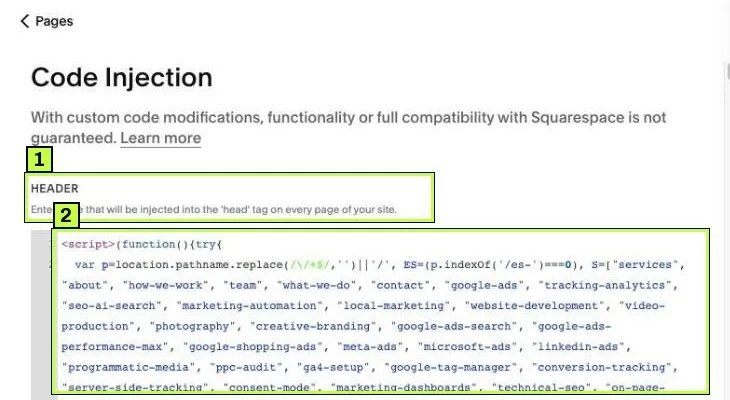
Paste the snippet into HEADER and click Save at the top left. Squarespace inserts its own tags before yours, so the snippet won't be the very first thing in <head>. That's fine; it still loads on every page. Since the current snippet has no <noscript> part, you don't need a body slot at all.
Squarespace also has a built-in Google Analytics field. If you load GA4 through GTM, leave that field empty.
Remove duplicates
Now remove anything that would double up:
- An old hard-coded
gtag.jsGA4 snippet, if GA4 will now run from GTM. - A plugin or platform setting that also adds GA4 with the same ID.
- A second GTM container nobody uses, or the old two-part GTM code for the same container.
Step 4: Add your first tag (GA4)
In GTM, go to Tags > New (or click Add tag on the overview page) and click Tag Configuration.
Google's GA4 help now lists two ways to do this. The recommended one is Google Analytics > Google Analytics, which adds GA4 as a destination. The alternative is the Google Tag type, which many existing containers use. Both ask for your GA4 measurement ID (G-XXXXXXXXXX) in Tag ID, and both can take optional Configuration settings and Shared event settings. You can skip those to keep the defaults.
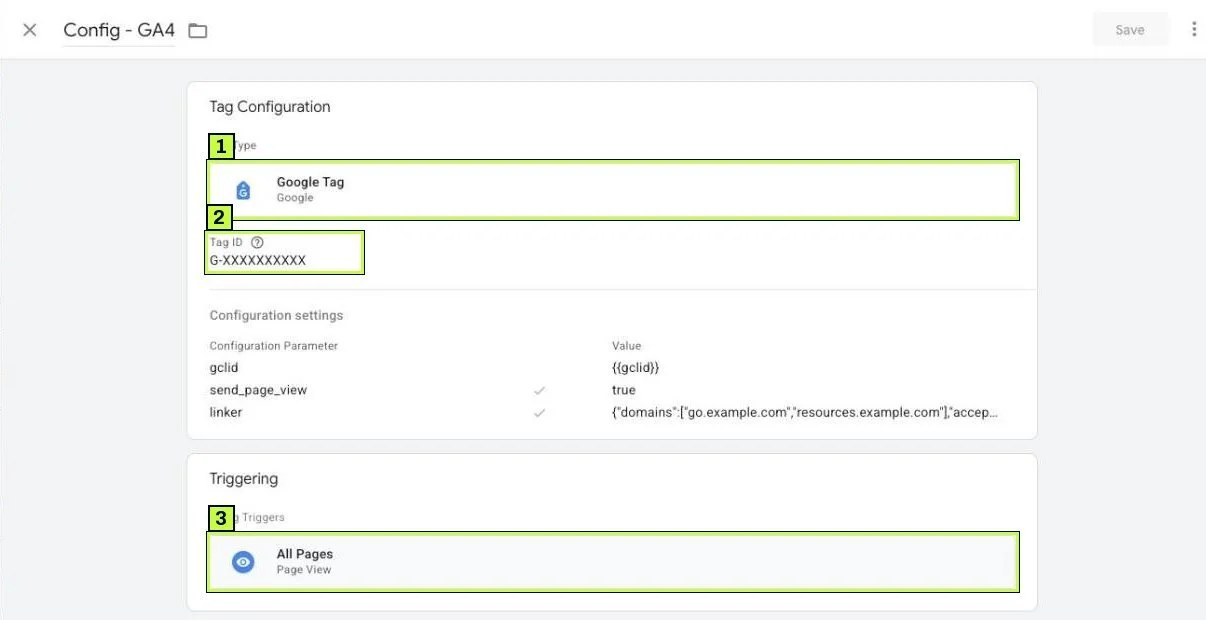
Under Triggering, choose the built-in initialization trigger. Most containers list it as Initialization - All Pages; Google's help calls it "Initialization - All Initialization Events." It fires the tag early, before most other tags. A Page View trigger like All Pages also works, as the example shows, but initialization is what Google suggests.
Name the tag something clear, like "GA4 - Google tag", and click Save.
If your site uses a consent banner, make sure Consent Mode defaults are set before this tag fires. That's a separate setup, but you can test it in the next step.
Step 5: Preview and debug with Tag Assistant
Nothing goes live until you publish. Preview lets you test first.
- In the GTM workspace, click Preview (top right). Tag Assistant opens in a new tab.
- Enter your site's URL and click Connect. Your site opens in a new window.
- A small badge on your site says Tag Assistant is connected.
- Go back to the Tag Assistant tab and click Continue.
Tag Assistant shows your container ID at the top, an event timeline on the left and tabs for Tags, Variables, Data Layer, Consent and Errors. Here's what to look for:
| Where | What you should see |
|---|---|
| Timeline (left) | Events like Consent Initialization, Initialization, Container Loaded, DOM Ready, Window Loaded for each page |
| Tags tab, first page | Your GA4 tag under Tags Fired |
| Tags tab, other tags | Tags that wait for an action (a click, a form) under Tags Not Fired until that action happens |
| Consent tab | Default and updated states for ad_storage, analytics_storage, ad_user_data and ad_personalization, if you use Consent Mode |
| Errors tab | Empty |
Click around your site. Each page and action adds events to the timeline. Click an event to see which tags fired at that moment.
If you need to test on a device or with a colleague, use Share from the Tag Assistant menu to send a preview link.
Step 6: Publish and check the live site
Back in GTM, click Submit. Add a Version name like "Install GTM + GA4" and a short description. Click Publish.
Now check the live site without preview:
- Open tagassistant.google.com, click Add domain, enter your URL and connect. It should find your container and the GA4 tag.
- Open the page source and confirm the GTM snippet is there, once.
- In Chrome DevTools, open Network, reload, and filter for
gtm.js. You should see one request with your container ID. - In GA4, open Reports > Realtime and confirm you show up as an active user.
- Optionally, paste your URL into Test your website in the GTM install panel and click Test.
If GA4 still shows nothing, our guide on troubleshooting GA4 with Realtime and DebugView goes through every cause.
Still not working? Common causes
| Symptom | Likely cause | Fix |
|---|---|---|
| Tag Assistant says no container found | Snippet missing, wrong ID, or page served from an old cache | View source, check the ID, clear site and CDN caches |
| Tag Assistant won't connect in Preview | Ad blocker, pop-up handling, or debug parameter breaks the page | Disable blockers, install the Tag Assistant extension, or untick Include debug signal in the URL |
| Container loads on some pages only | Snippet in one page template, not the shared header | Move it to the global header template or site-wide injection |
| GA4 page views counted twice | GA4 hard-coded and also in GTM, or two containers | Keep one source of GA4 and remove the other |
| GTM loads twice | Old two-part code and the new snippet both installed | Keep one version of the code |
| Works in Preview, not live | Changes were never published, or wrong environment | Click Submit > Publish; check Versions for the live version |
gtm.js blocked in the console |
Content Security Policy doesn't allow googletagmanager.com | Add GTM and Google domains to the CSP allowlist |
| Shopify purchases not tracked via GTM | Checkout doesn't run theme code | Use the Google & YouTube app or a custom pixel in Customer events |
| Tags fire before consent | GTM loads before the consent default is set | Load the CMP or consent defaults first and test in the Consent tab |
| Tag Assistant shows two containers | Old agency or plugin container still installed | Confirm ownership and remove the unused one |
Caching and page builders
Caching plugins and CDNs often keep serving HTML from before you added GTM. Purge everything after installing. Some page builders also have their own "header scripts" field. Use only one place for the snippet.
Server-side and first-party setups
If someone set up server-side tagging or Google tag gateway (it's listed in the GTM Admin tab), the script may load from your own domain instead of googletagmanager.com. That's fine. Verify it the same way in Tag Assistant, and don't add a second standard snippet next to it.
How to confirm it's fixed
You're done when all of these are true:
- Page source shows one GTM snippet with your ID, on every template you checked (home, a blog post, a product or service page, a form page).
- Tag Assistant, connected without Preview, finds the container and the GA4 tag.
- GTM Versions shows your published version as Live.
- GA4 Realtime shows your visit within a minute or two.
- There are no duplicate page view events in GA4 DebugView or Realtime.
Check again after any theme update or redesign. Theme changes are the most common way GTM disappears.
Once the container is in place, you can add more tags. Next steps that usually come right after: setting up Consent Mode v2 in GTM and tracking form submissions.
FAQ
Do I still need the noscript snippet?
Not for new installs. The current Install manually tab shows only the head snippet. The old <noscript> iframe only ran for visitors with JavaScript turned off, and most tags (GA4 included) don't run there anyway. If your site already has it, you can leave it in place.
Can I use GTM and gtag.js at the same time?
You can, but don't send the same GA4 data from both. Pick one place for each tag. Duplicates are the most common reason for doubled page views. The install screen says it plainly: don't add more than one Google tag to each page.
Should I use the CMS option or install manually?
If your platform is listed under Install with a website builder or CMS and its integration covers what you need, it saves you from editing code. Install manually when you want full control over where the snippet sits, or when your platform isn't listed.
Will GTM slow down my site?
The snippet loads asynchronously, so it doesn't block the page by itself. What you put inside it can. Remove unused tags and check Core Web Vitals after big changes.
Who should own the GTM account?
The business should. Create it under a company Google account and give agencies or freelancers user access. That way you never lose access when people change.
Is Tag Assistant Companion still needed?
Google merged the Companion into the main Tag Assistant extension. Install the current Tag Assistant extension for the smoothest preview connection.
Stuck on this one? We fix these for clients every week. Book a free audit
